Hardware and Software
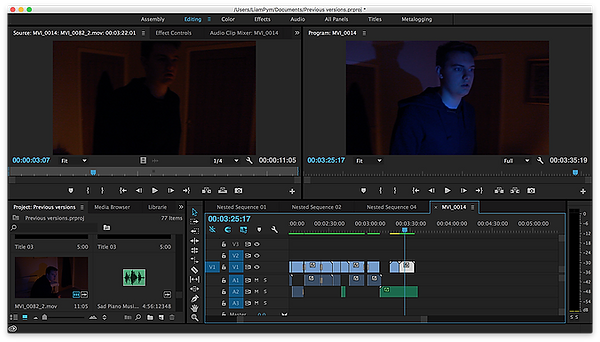
When it came to the post-production stage of creating our opening sequence, there was a number of aspects we needed to consider when trying to create our final product. In the end, we decided to use Liam Pyms MacBook Pro in order to edit our footage, the main reason we decided to do this was because me and liam was going to be doing the editing for our sequence. Therefore, in order to make it easy to transport to school etc we thought it would be best to do it on a laptop which could be taken in and out of school to edit in our free time etc. We also decided to edit on my computer as I already had Adobe Premiere Pro CS6 installed on my computer so we could edit etc.


The Editing Process

The first part of our editing involved putting all of our footage from our first shoot into Premiere Pro. From here we put the main elements of footage together and did a rough cut of where each clip would go. At this point, we needed more footage in order to make more precise cuts so we roughly put our clips together.

After putting the footage into Premiere Pro, we felt that the footage looked was very grainy had had a large amount of visual noise, we therefore decided to put the footage into After Effects in order to alter the lighting of our footage. We did this by altering the brightness and contrast in the program. This proved particularly challenging and time consuming as we had to do this to every shot in our sequence and exporting it into Premiere Pro to then edit after. This also made the size of the files for each of our clips very large which used alot of hard disk space etc:
before
after


The editing process mostly stopped at this point, untill we were able to get more footage. This was the point at which we ordered the camera headmount so we could use first person shots. Once we did additional filming, editing could continue. After we got some aditional footage, We then added the footage that was captured into Premiere Pro. At this point, finer details and cuts could be made in order to make our sequence have better continuity etc and make it flow from one another.

Because many of the different shots didn't fully match in the same sequence, we decided to add a number of fading edits and effects so that the sequence wouldn't feel choppy or out of place in order to make it flow better. At this point, many of the clips that were shot were unstable and choppy. One of the tools we therefore decided to use in Premiere Pro was the 'Warp Stabalizer' tool, this allowed us to smoothen the footage to make the shot look more professional. Applying these effects such as fading and stabalizing to our sequence, this helped the sequence look more proffessional and better quality.

After our final shooting session, all of our footage was added to Premiere Pro after altering the colouration of shots in order to get the look that we wanted. For example, changing the colour of the police sequence to make the colour more suitable as a police light in After Effects.

We then looked for a variety of different types of diegetic sounds and background noises from the internet which would fit into our sequence. This included sounds just as quiet traffic noises etc which would fit the sequence when the character is walking down the street etc. We also got sounds such as heartbeats etc to make the scene more tense when the audience watched the sequence. These different sounds were sourced from the internet at non-copyrighted so that we could freely use them for our production. Once we got these sounds, we edited them in with a number of effects such as fading them in or gradually speeding them up etc.

We then looked to find music which could be used for our sequence. We found this rather challenging to get the right style of music which would fit our sequence well which would convey the tone which we wanted the audience to feel.

unit 1 & 22
The editing procceses was written by Liam P.